In my homelab setup I am using UniFi network components and I was looking for a secure way to connect to my environment when I am on the road. After doing some research on the technical implementations, I found that OpenVPN – at least in theory – offers the best security, performance and reliability compared to L2TP / IPSec and PPTP.
There are several guides how to configure this for a UniFi Security Gateway, however, I found that many of them are lacking important information or were wrong. I ‘trial ‘n error’d’ through those guides until I found a setup which is working quite well for me.
Authentication requirements
As a prerequisite, you will need to enable the built in Radius Server on the USG. To do that, navigate to your UniFi Controller and navigate to Settings – Services. Enable the Radius Server from the menu and enter your secret key:

From the users tab, you can add your OpenVPN users. I recommend specifying a different VLAN for security reasons.
Tunnel type: 3 – Layer Two Tunneling Protocol (L2TP)
Tunnel medium type: 1 – IPv4 (IP version 4)

Since you should have entered two passwords after the first part already, I recommend you start using a password manager now if you do not use one already. Generating strong unique passwords and saving it using a proper password manager is essential – I recommend Bitwarden.
Set up easy-rsa and key generation
You need to connect to your USG using SSH. If you have not enabled SSH yet, you will need to activate advanced mode in your site settings:

The SSH login can also be configured in the site settings:

Now you can connect to your USG using SSH, I’m using Putty:

Download and install easy-rsa
sudo bash
curl -O http://ftp.us.debian.org/debian/pool/main/e/easy-rsa/easy-rsa_2.2.2-1_all.deb
sudo dpkg -i easy-rsa_2.2.2-1_all.deb
Initialize the PKI and build the CA certificate and key
cd /usr/share/easy-rsa
. vars
./clean-all
./build-ca
After you entered the ./build-ca command, you will be prompted for several parameters of which only the ‘Common Name’ needs to be defined.
Generate a certificate and private key for the server
Give it a common name like “OpenVPN CA”.
./build-key-server server
Confirm both prompts with yes:
‘Sign the certificate? [y/n]’ and ‘1 out of 1 certificate requests certified, commit? [y/n]’
Generate Diffie Hellman parameters
./build-dh
Note that this process will take a long time to complete. In my case it took about 20 minutes.
You will end up with several files in the keys directory:
| File | Needed by | Purpose | Secret |
| ca.crt | server + all clients | Root CA certificate | NO |
| ca.key | key signing machine only | Root CA key | YES |
| dh{n}.pem | server only | Diffie Hellman parameters | NO |
| server.crt | server only | Server certificate | NO |
| server.key | server only | Server key | YES |
Copy the keys to the /config/auth/keys/ folder
mkdir /config/auth/keys/
cp keys/* /config/auth/keys/
Configure OpenVPN on the USG
Note: In line 3, insert your own subnet and pick one which is not in use anywhere else on your USG. You might want to edit other options like DNS as well.
configure
set interfaces openvpn vtun0 mode server
set interfaces openvpn vtun0 server subnet 192.168.30.0/24
set interfaces openvpn vtun0 tls ca-cert-file /config/auth/keys/ca.crt
set interfaces openvpn vtun0 tls cert-file /config/auth/keys/server.crt
set interfaces openvpn vtun0 tls key-file /config/auth/keys/server.key
set interfaces openvpn vtun0 tls dh-file /config/auth/keys/dh2048.pem
set interfaces openvpn vtun0 encryption aes128
set interfaces openvpn vtun0 openvpn-option "--keepalive 8 30"
set interfaces openvpn vtun0 openvpn-option "--comp-lzo"
set interfaces openvpn vtun0 openvpn-option "--duplicate-cn"
set interfaces openvpn vtun0 openvpn-option "--user nobody --group nogroup"
set interfaces openvpn vtun0 openvpn-option "--plugin /usr/lib/openvpn/openvpn-auth-pam.so openvpn"
set interfaces openvpn vtun0 openvpn-option "--client-cert-not-required --username-as-common-name"
set interfaces openvpn vtun0 openvpn-option "--verb 1"
set interfaces openvpn vtun0 openvpn-option "--proto udp6"
set interfaces openvpn vtun0 openvpn-option "--port 1194"
set interfaces openvpn vtun0 openvpn-option "--push redirect-gateway def1"
set interfaces openvpn vtun0 openvpn-option "--push dhcp-option DNS 8.8.8.8"
set interfaces openvpn vtun0 openvpn-option "--push dhcp-option DNS 8.8.4.4"
Configure your firewall so that it accepts OpenVPN connections on the WAN interface
set firewall name WAN_LOCAL rule 20 action accept
set firewall name WAN_LOCAL rule 20 description "Allow OpenVPN clients in"
set firewall name WAN_LOCAL rule 20 destination port 1194
set firewall name WAN_LOCAL rule 20 log disable
set firewall name WAN_LOCAL rule 20 protocol udp
Optionally configure the same rule for IPv6
set firewall ipv6-name wan_local-6 rule 20 action accept
set firewall ipv6-name wan_local-6 rule 20 description "Allow OpenVPN clients in"
set firewall ipv6-name wan_local-6 rule 20 destination port 1194
set firewall ipv6-name wan_local-6 rule 20 log disable
set firewall ipv6-name wan_local-6 rule 20 protocol udp
Configure your USG to allow traffic from OpenVPN users to Internet
set service nat rule 5010 description "Masquerade for WAN"
set service nat rule 5010 outbound-interface eth0
set service nat rule 5010 type masquerade
commit
save
exit
Create an .ovpn file
Paste the below into a new file, edit the hostname in line 5. Instead of the hostname you can also enter your WAN IP. I recommend using a hostname with dynamic DNS. With Namecheap for example, you can use an ‘A + Dynamic DNS Record’.
Then paste your certificate info in line 18. Copy it from /config/auth/keys/ca.crt.
client
float
dev tun

remote vpn.hostname.com 1194 udp

auth-nocache
resolv-retry infinite
nobind
persist-key
persist-tun
auth-user-pass
cipher AES-128-CBC
comp-lzo
verb 3
<ca>
-----BEGIN CERTIFICATE-----
INSERT YOUR CERT HERE
-----END CERTIFICATE-----
</ca>

# this is an random certificate. The .ovpn file needs one, but does not use it, so you can leave this as is
<cert>
-----BEGIN CERTIFICATE-----
MIIB1jCCAT+gAwIBAgIEAmLSTjANBgkqhkiG9w0BAQUFADAVMRMwEQYDVQQDEwpP
cGVuVlBOIENBMB4XDTEzMDExNzAyMTExMloXDTIzMDEyMjAyMTExMlowKDEmMCQG
A1UEAxQdZnJyaWN0aW9uQGdtYWlsLmNvbV9BVVRPTE9HSU4wgZ8wDQYJKoZIhvcN
AQEBBQADgY0AMIGJAoGBALVEXIZYYu1Inmejuo4Si6Eo5AguTX5sg1pGbLkJSTR4
BXQsy6ocUnZ9py8htYkipkUUhjY7zDu+wJlUtWnVCwCYtewYfEc/+azH7+7eU6ue
T2K2IKdik1KWhdtNbaNphVvSlgdyKiuZDTCedptgWyiL50N7FMcUUMjjXYh/hftB
AgMBAAGjIDAeMAkGA1UdEwQCMAAwEQYJYIZIAYb4QgEBBAQDAgeAMA0GCSqGSIb3
DQEBBQUAA4GBABhVzSYXHlQEPNaKGmx9hMwwnNKcHgD9cCmC9lX/KR2Y+vT/QGxK
7sYlJInb/xmpa5TUQYc1nzDs9JBps1mCtZbYNNDpYnKINAKSDsM+KOQaSYQ2FhHk
bmBZk/K96P7VntzYI5S02+hOWnvjq5Wk4gOt1+L18+R/XujuxGbwnHW2
-----END CERTIFICATE-----
</cert>

# this is an random key. The .ovpn file needs one, but does not use it, so you can leave this as is
<key>
-----BEGIN PRIVATE KEY-----
MIICdgIBADANBgkqhkiG9w0BAQEFAASCAmAwggJcAgEAAoGBALVEXIZYYu1Inmej
uo4Si6Eo5AguTX5sg1pGbLkJSTR4BXQsy6ocUnZ9py8htYkipkUUhjY7zDu+wJlU
tWnVCwCYtewYfEc/+azH7+7eU6ueT2K2IKdik1KWhdtNbaNphVvSlgdyKiuZDTCe
dptgWyiL50N7FMcUUMjjXYh/hftBAgMBAAECgYEAsNjgOEYVRhEaUlzfzmpzhakC
SKT8AALYaAPbYO+ZVzJdh8mIbg+xuF7A9G+7z+5ZL35lrpXKnONuvmlxkK5ESwvV
Q7EOQYCZCqa8xf3li3GUBLwcwXKtOUr3AYXhdbOh2viQdisD4Ky7H6/Nd3yMc3bu
R4pErmWeHei+l6dIwAECQQDqljNxi9babmHiei6lHaznCMg5+jfAyDXgHvO/afFr
1bDQVDTDK+64kax4E9pvDZC6B/HGse9hOUGWXTjb0WZBAkEAxdAw/14iJIUcE5sz
HDy2R0RmbUQYFjrNgBCi5tnmr1Ay1zHAs1VEF+Rg5IOtCBO50I9jm4WCSwCtN6zF
FoFVAQJAUGfBJDcZIm9ZL6ZPXJrqS5oP/wdLmtFE3hfd1gr7C8oHu7BREWB6h1qu
8c1kPlI4+/qDHWaZtQpJ977mIToJwQJAMcgUHKAm/YPWLgT31tpckRDgqgzh9u4z
e1A0ft5FlMcdFFT8BuWlblHWJIwSxp6YO6lqSuBNiuyPqxw6uVAxAQJAWGxOgn2I
fGkWLLw4WMpkFHmwDVTQVwhTpmMP8rWGYEdYX+k9HeOJyVMrJKg2ZPXOPtybrw8T
PUZE7FgzVNxypQ==
-----END PRIVATE KEY-----
</key>
Configuring OpenVPN to use Radius for authentication
Create a file /etc/pam_radius_auth.conf with your Radius server IP (USG IP) and the shared secret you used when enabled the Radius server. Use vi to edit the file to avoid formatting issues.
RADIUSSERVERIP SHAREDSECRET
Create a file /etc/pam.d/openvpn with the following contents:
auth sufficient pam_radius_auth.so debug
account sufficient pam_permit.so
session sufficient pam_permit.so
Make the changes persistent
Now you can test the connection, but the above changes are not persistent yet and will be lost once you reboot your USG or once you upgrade the firmware. So here is how we can make this configuration survive a reboot. Copy the previously created files into a new folder /config/scripts/ovpn_radius_config:
mkdir /config/scripts/ovpn_radius_config
cp /etc/pam_radius_auth.conf /config/scripts/ovpn_radius_config/pam_radius_auth.conf
cp /etc/pam.d/openvpn /config/scripts/ovpn_radius_config/openvpn
Copy the following content into a new file /config/scripts/postprovision.sh
#!/bin/vbash
readonly logFile="/var/log/postprovision.log"

source /opt/vyatta/etc/functions/script-template

echo "$(date) - Beginning post provision steps" >> ${logFile}
#restore the ssmtp configuration

cp -f /config/scripts/ovpn_radius_config/pam_radius_auth.conf /etc
cp -f /config/scripts/ovpn_radius_config/openvpn /etc/pam.d/openvpn

#the following lines remove the postprovision scheduled task
#do not modify below this line

configure >> ${logFile}
delete system task-scheduler task postprovision >> ${logFile}
commit >> ${logFile}
save >> ${logFile}
#exit

#end no edit

exit

echo "$(date) - Finished post provision steps" >> ${logFile}
Make the script executable:
sudo chmod +x /config/scripts/postprovision.sh
Copy the following script to /config/scripts/post-config.d/postreboot.sh and make it executable as well:
#!/bin/vbash
readonly logFile="/var/log/postreboot.log"

source /opt/vyatta/etc/functions/script-template

#restore the radius configuration
echo "Copying PAM and OpenVPN config files" >> ${logFile}
cp -f /config/scripts/ovpn_radius_config/pam_radius_auth.conf /etc
cp -f /config/scripts/ovpn_radius_config/openvpn /etc/pam.d/openvpn
sudo chmod +x /config/scripts/post-config.d/postreboot.sh
Now you also need to edit your config.gateway.json file to make the above changes persistent or create this file if you do not use this yet.
Depending on which UniFi Controller you use, the file can be located in different folders. On a UniFi Cloud Key for example you can find the file here if you only have one site: /srv/unifi/data/sites/default/
In my case I had to create the folders /sites and /default because they did not exist yet.
Remember to edit your subnet in line 57 accordingly and also other changes from the above steps.
Also, if you want to merge the below file with your existing file, or you want to include other options and the settings are not applied correctly when booting your USG, there is a chance your json format is wrong. You can check your file here and get infos on how to fix syntax issues: https://jsonformatter.curiousconcept.com/
{
        "firewall": {
                "ipv6-name": {
                        "wan_local-6": {
                                "default-action": "drop",
                                "rule": {
                                        "20": {
                                                "action": "accept",
                                                "description": "Allow OpenVPN clients in",
                                                "destination": {
                                                        "port": "1194"
                                                },
                                                "log": "disable",
                                                "protocol": "udp"
                                        }
                                }
                        }
                },
                "name": {
                        "WAN_LOCAL": {
                                "default-action": "drop",
                                "description": "packets from internet to gateway",
                                "rule": {
                                        "20": {
                                                "action": "accept",
                                                "description": "Allow OpenVPN clients in",
                                                "destination": {
                                                        "port": "1194"
                                                },
                                                "log": "disable",
                                                "protocol": "udp"
                                        }
                                }
                        }
                }
        },
        "interfaces": {
                "openvpn": {
                        "vtun0": {
                                "encryption": "aes128",
                                "mode": "server",
                                "openvpn-option": [
                                        "--keepalive 8 30",
                                        "--comp-lzo",
                                        "--duplicate-cn",
                                        "--user nobody --group nogroup",
                                        "--plugin /usr/lib/openvpn/openvpn-auth-pam.so openvpn",
                                        "--client-cert-not-required --username-as-common-name",
                                        "--verb 1",
                                        "--proto udp6",
                                        "--port 1194",
                                        "--push redirect-gateway def1",
                                        "--push dhcp-option DNS 8.8.8.8",
                                        "--push dhcp-option DNS 8.8.4.4"
                                ],
                                "server": {
                                        "subnet": "192.168.30.0/24"
                                },
                                "tls": {
                                        "ca-cert-file": "/config/auth/keys/ca.crt",
                                        "cert-file": "/config/auth/keys/server.crt",
                                        "dh-file": "/config/auth/keys/dh2048.pem",
                                        "key-file": "/config/auth/keys/server.key"
                                },
								"firewall": {
									"in": {
									"name": "LAN_IN"
									},
									"local": {
									"name": "LAN_LOCAL"
									},
									"out": {
									"name": "LAN_OUT"
									}
								}
						}
				}
		},
        "service": {
                "nat": {
                        "rule": {
                                "5010": {
                                        "description": "Masquerade for WAN",
                                        "outbound-interface": "eth0",
                                        "type": "masquerade"
                                }
                        }
                }
        },
        "system": {
                "task-scheduler": {
                        "task": {
                                "postprovision": {
                                        "executable": {
                                                "path": "/config/scripts/postprovision.sh"
                                        },
                                        "interval": "3m"
                                }
                        }
                }
        }
}
By default the vtun0 interface is not part of any other existing interface group (WAN, LAN, GUEST). That’s why firewall rules do not apply and OpenVPN users can access any network on your USG. To mitigate that, I added lines 65 to 75. Of course you also need to add firewall rules, see below.
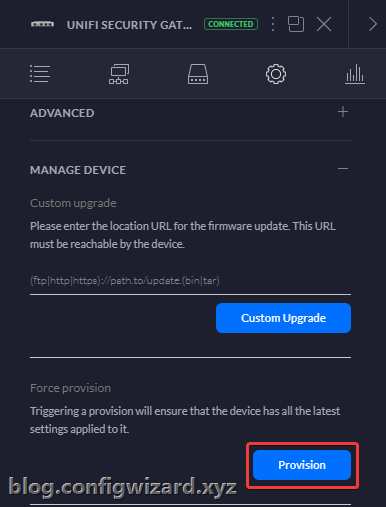
After placing the modified config.gateway.json file in the corresponding location, you may force provision your USG from the Controller to apply the settings:
Firewall rules
I want to allow my OpenVPN clients to access my homelab, but I want to block access to my other networks. First, define the network group in your firewall settings. Also, depending on your setup you can create further network combinations here for the other rules (see my examples below):

Then create the LAN IN rules. As you can see I will allow access to my homelab network, but I will drop any connection attempt to a network group called ‘OpenVPN Block’ with my private network devices. If you want to use Internet, make sure not to block your WAN network.

Allow rule (exceptions):

The drop rule will discard any traffic from the OpenVPN network to your list of defined networks:

Last but not least, you will need to create the following LAN OUT rule, to make sure to receive outgoing packets.
You only need to allow established and related states:


Final connection test
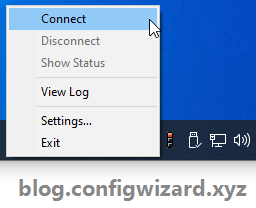
Now it’s time to test the connection:

As you can see, the connection works as intended! 😊
If there any questions or issues you experience, do not hesitate writing a comment or contacting me.
Hi,
First thanks for your tutorial, but i have a problem, when y try the connected whith OpenVPN, is not possible and report this error:
2021-02-11 09:48:46 OpenSSL: error:09091064:PEM routines:PEM_read_bio_ex:bad base64 decode
2021-02-11 09:48:46 MANAGEMENT: Client disconnected
2021-02-11 09:48:46 Cannot load CA certificate file [[INLINE]] (no entries were read)
2021-02-11 09:48:46 Exiting due to fatal error
I don’t have where is the problem.
Could you help me?
Hi Xavier,
In the step “Create an .ovpn file” did you follow the instructions exactly? Especially where you paste the certificate info in line 18. Make sure you are not missing the certificate info.
Hi Kevin,
First thanks for your answer, this point I have already solved.
But now I get this error:
2021-02-14 10:09:14 WARNING: No server certificate verification method has been enabled. See http://openvpn.net/howto.html#mitm for more info.
2021-02-14 10:09:14 TCP/UDP: Preserving recently used remote address: [AF_INET]XX.XX.XX.XX:1194
2021-02-14 10:09:14 Socket Buffers: R=[65536->65536] S=[65536->65536]
2021-02-14 10:09:14 UDP link local: (not bound)
2021-02-14 10:09:14 UDP link remote: [AF_INET]XX.XX.XX.XX:1194
2021-02-14 10:09:14 MANAGEMENT: >STATE:1613293754,WAIT,,,,,,
2021-02-14 10:10:14 TLS Error: TLS key negotiation failed to occur within 60 seconds (check your network connectivity)
2021-02-14 10:10:14 TLS Error: TLS handshake failed
2021-02-14 10:10:14 SIGUSR1[soft,tls-error] received, process restarting
2021-02-14 10:10:14 MANAGEMENT: >STATE:1613293814,RECONNECTING,tls-error,,,,,
2021-02-14 10:10:14 Restart pause, 5 second(s).
Thanks for your help
Hi Xavier,
Is your USG behind a router? If so, is port 1194 properly forwarded? Does your USG accept incoming connections on port 1194?
Hi,
It’s behind Router.
I have followed the manual step by step and I only need this point.
Ip router:
192.168.1.1
Ip Wan USG:
192.168.1.10
Lan IP USG 10.10.10.1
The VPN has to have access to the entire LAN.
And the VPN Ip:
10.10.8.0/29
I have been able to fix the TLS error, the problem is the router.
But now the user does not recognize me:
2021-02-19 22:49:18 VERIFY OK: depth = 0, C = US, ST = CA, L = SanFrancisco, O = Fort-Funston, OU = MyOrganizationalUnit, CN = OpenVPN-CA, name = EasyRSA, emailAddress =me@myhost.mydomain
2021-02-19 22:49:20 Control Channel: TLSv1, SSLv3 cipher DHE-RSA-AES256-SHA, 2048 bit RSA
2021-02-19 22:49:20 [OpenVPN-CA] Peer Connection Initiated with [AF_INET] XX.XX.XX.XX: 1194
2021-02-19 22:49:21 MANAGEMENT:> STATE: 1613771361, GET_CONFIG ,,,,,,
2021-02-19 22:49:21 SENT CONTROL [OpenVPN-CA]: ‘PUSH_REQUEST’ (status = 1)
2021-02-19 22:49:21 AUTH: Received control message: AUTH_FAILED
2021-02-19 22:49:21 SIGUSR1 [soft, auth-failure] received, process restarting
2021-02-19 22:49:21 MANAGEMENT:> STATE: 1613771361, RECONNECTING, auth-failure ,,,,,
2021-02-19 22:49:21 Restart pause, 5 second (s)
Any Idea??
Hi Xavier, I’m going through the same problems as you, first SSL (generating new keys helped) and now I’m in exactly the same situation as you write, after one attempt it comes back to the login dialog with a “Wrong credentials. Try again…” message, have you managed to solve it?
To both of you: Do you use any special characters in your password OR in your username? For example + signs will not work in the username.
Try setting the radius user password to a simple one temporarily to test the connection.
Also try removing the auth-nocache line in the vpn config file and instead add auth-retry nointeract in the same line.
Hi Kevin, thank you for the tips. I only have lowercase English letters in my user account names and passwords. I have modified the OpenVPN configuration file according to your recommendations. Unfortunately, it still doesn’t work for me. I find it strange that PPTP or L2TP VPNs defined directly in the Unifi GUI don’t work either. Something with Radius or rather a firewall? And is it normal that the OpenVPN network is not visible in the network list?
Thank you
Hi,
How did you manage to fix auth-failure error message:
2023-02-08 19:52:16 AUTH: Received control message: AUTH_FAILED
2023-02-08 19:52:16 SIGUSR1[soft,auth-failure] received, process restarting
The user and password that I have tested are simple; also I have changed in config file auth-nocache line with auth-retry nointeract
it is working now!
what I did wrong was the ip from this line: RADIUSSERVERIP SHAREDSECRET
Hello Kevin,
thanks for your tutorial, trying to get it work all day but no luck.
I have USG connected to provider with satelite modem in bridge mode, so WAN side of USG has public IP but cannot connect 🙁 Here is log from client:
Fri Apr 23 16:55:08 2021 WARNING: Compression for receiving enabled. Compression has been used in the past to break encryption. Sent packets are not compressed unless “allow-compression yes” is also set.
Fri Apr 23 16:55:08 2021 DEPRECATED OPTION: –cipher set to ‘AES-128-CBC’ but missing in –data-ciphers (AES-256-GCM:AES-128-GCM). Future OpenVPN version will ignore –cipher for cipher negotiations. Add ‘AES-128-CBC’ to –data-ciphers or change –cipher ‘AES-128-CBC’ to –data-ciphers-fallback ‘AES-128-CBC’ to silence this warning.
Fri Apr 23 16:55:08 2021 OpenVPN 2.5.1 x86_64-w64-mingw32 [SSL (OpenSSL)] [LZO] [LZ4] [PKCS11] [AEAD] built on Feb 24 2021
Fri Apr 23 16:55:08 2021 Windows version 10.0 (Windows 10 or greater) 64bit
Fri Apr 23 16:55:08 2021 library versions: OpenSSL 1.1.1j 16 Feb 2021, LZO 2.10
Fri Apr 23 16:55:08 2021 MANAGEMENT: TCP Socket listening on [AF_INET]127.0.0.1:25343
Fri Apr 23 16:55:08 2021 Need hold release from management interface, waiting…
Fri Apr 23 16:55:08 2021 MANAGEMENT: Client connected from [AF_INET]127.0.0.1:25343
Fri Apr 23 16:55:08 2021 MANAGEMENT: CMD ‘state on’
Fri Apr 23 16:55:08 2021 MANAGEMENT: CMD ‘log all on’
Fri Apr 23 16:55:08 2021 MANAGEMENT: CMD ‘echo all on’
Fri Apr 23 16:55:08 2021 MANAGEMENT: CMD ‘bytecount 5’
Fri Apr 23 16:55:08 2021 MANAGEMENT: CMD ‘hold off’
Fri Apr 23 16:55:08 2021 MANAGEMENT: CMD ‘hold release’
Fri Apr 23 16:55:10 2021 MANAGEMENT: CMD ‘username “Auth” “xxxx”‘
Fri Apr 23 16:55:10 2021 MANAGEMENT: CMD ‘password […]’
Fri Apr 23 16:55:10 2021 WARNING: No server certificate verification method has been enabled. See http://openvpn.net/howto.html#mitm for more info.
Fri Apr 23 16:55:10 2021 TCP/UDP: Preserving recently used remote address: [AF_INET]95.XXX.XXX.XXX:1194
Fri Apr 23 16:55:10 2021 Socket Buffers: R=[65536->65536] S=[65536->65536]
Fri Apr 23 16:55:10 2021 UDP link local: (not bound)
Fri Apr 23 16:55:10 2021 UDP link remote: [AF_INET]95.XXX.XXX.XXX:1194
Fri Apr 23 16:55:10 2021 MANAGEMENT: >STATE:1619189710,WAIT,,,,,,
Fri Apr 23 16:55:11 2021 MANAGEMENT: >STATE:1619189711,AUTH,,,,,,
Fri Apr 23 16:55:11 2021 TLS: Initial packet from [AF_INET]95.XXX.XXX.XXX:1194, sid=c5f49xxx xxxxx82f
Fri Apr 23 16:55:16 2021 VERIFY OK: depth=1, C=CZ, ST=OpenVPN CA, L=Xxxx, O=Xxxx, OU=Xxxx, CN=OpenVPN CA, name=EasyRSA, emailAddress=me@myhost.mydomain
Fri Apr 23 16:55:16 2021 VERIFY OK: depth=0, C=CZ, ST=CA, L=Xxxx, O=Xxxx, OU=Xxxx, CN=OpenVPN CA, name=EasyRSA, emailAddress=me@myhost.mydomain
Fri Apr 23 16:56:10 2021 TLS Error: TLS key negotiation failed to occur within 60 seconds (check your network connectivity)
Fri Apr 23 16:56:10 2021 TLS Error: TLS handshake failed
Fri Apr 23 16:56:10 2021 SIGUSR1[soft,tls-error] received, process restarting
Fri Apr 23 16:56:10 2021 MANAGEMENT: >STATE:1619189770,RECONNECTING,tls-error,,,,,
Fri Apr 23 16:56:10 2021 Restart pause, 5 second(s)
Please can you help me? Thank you
Does this still work with USG-3P V 4.4.55? I get an “OpenVPN configuration error: Failed to start OpenVPN tunnel” at config commit. It doesn’t like something in the openvpn config but I double checked and all settings are correct.
Scratch that, I had an extra . in the IP directive! (duh) I checked /var/log/messages and found out why.
Hi,
I keep running into problems with the configuration not being saved.
I tried different steps, also with the config.gateway.json file, but nothing seems to work.
Every time changes are made in the Unifi Controller and they are saved, all settings are gone!
Can this be solved in another way?
The USG is running on version: 4.4.56.5449062
And is this still the best and safest way to connect?
Thanks!
Thank you for this tutorial.
Unfortunately, the clients no longer have internet access after the connection is established.
*I did not make the changes after modifying config.gateway.json because I have no restrictions internally under the networks.
Thanks
Hi Armin,
Did you configured the Service NAT Rule?
For allowing traffic from the vpn users to the internet.
I only configured:
set service nat rule 5010 description “Masquerade for WAN”
set service nat rule 5010 outbound-interface eth0
set service nat rule 5010 type masquerade
And it works fine for me!
This part is giving me some hugh issues:
Now you also need to edit your config.gateway.json file to make the above changes persistent or create this file if you do not use this yet.
How and where to put those when iam using a hosted unifi controller?
really a good manual in setting up OpenVPN, but somehow I have missed something in it as I can’t login with the users fra Radius on the cloudkey. I have a L2TP setup allready and dont know if that’s the problem. the anonymized log from login is pasted below. thanks in advance for your help.
2022-11-20 15:26:15 WARNING: Compression for receiving enabled. Compression has been used in the past to break encryption. Sent packets are not compressed unless “allow-compression yes” is also set.
2022-11-20 15:26:15 DEPRECATED OPTION: –cipher set to ‘AES-128-CBC’ but missing in –data-ciphers (AES-256-GCM:AES-128-GCM). Future OpenVPN version will ignore –cipher for cipher negotiations. Add ‘AES-128-CBC’ to –data-ciphers or change –cipher ‘AES-128-CBC’ to –data-ciphers-fallback ‘AES-128-CBC’ to silence this warning.
2022-11-20 15:26:15 OpenVPN 2.5.2 x86_64-w64-mingw32 [SSL (OpenSSL)] [LZO] [LZ4] [PKCS11] [AEAD] built on Apr 21 2021
2022-11-20 15:26:15 Windows version 10.0 (Windows 10 or greater) 64bit
2022-11-20 15:26:15 library versions: OpenSSL 1.1.1k 25 Mar 2021, LZO 2.10
Enter Management Password:
2022-11-20 15:26:15 MANAGEMENT: TCP Socket listening on [AF_INET]127.0.0.1:25340
2022-11-20 15:26:15 Need hold release from management interface, waiting…
2022-11-20 15:26:16 MANAGEMENT: Client connected from [AF_INET]127.0.0.1:25340
2022-11-20 15:26:16 MANAGEMENT: CMD ‘state on’
2022-11-20 15:26:16 MANAGEMENT: CMD ‘log all on’
2022-11-20 15:26:16 MANAGEMENT: CMD ‘echo all on’
2022-11-20 15:26:16 MANAGEMENT: CMD ‘bytecount 5’
2022-11-20 15:26:16 MANAGEMENT: CMD ‘hold off’
2022-11-20 15:26:16 MANAGEMENT: CMD ‘hold release’
2022-11-20 15:26:29 MANAGEMENT: CMD ‘username “Auth” “ddv”‘
2022-11-20 15:26:29 MANAGEMENT: CMD ‘password […]’
2022-11-20 15:26:29 WARNING: No server certificate verification method has been enabled. See http://openvpn.net/howto.html#mitm for more info.
2022-11-20 15:26:29 MANAGEMENT: >STATE:1668954389,RESOLVE,,,,,,
2022-11-20 15:26:29 TCP/UDP: Preserving recently used remote address: [AF_INET]xxx.167.171.6:1194
2022-11-20 15:26:29 Socket Buffers: R=[65536->65536] S=[65536->65536]
2022-11-20 15:26:29 UDP link local: (not bound)
2022-11-20 15:26:29 UDP link remote: [AF_INET]93.167.171.6:1194
2022-11-20 15:26:29 MANAGEMENT: >STATE:1668954389,WAIT,,,,,,
2022-11-20 15:26:29 MANAGEMENT: >STATE:1668954389,AUTH,,,,,,
2022-11-20 15:26:29 TLS: Initial packet from [AF_INET]xxx.167.171.6:1194, sid=7c85a315 50340aec
2022-11-20 15:26:30 VERIFY OK: depth=1, C=DK, ST=CA, L=Jonstrup, O=Brdr, OU=MyOrganizationalUnit, CN=brdr, name=EasyRSA, emailAddress=support@xxx.nu
2022-11-20 15:26:30 VERIFY OK: depth=0, C=DK, ST=DK, L=Jonstrup, O=Fort-Funston, OU=MyOrganizationalUnit, CN=brdr, name=EasyRSA, emailAddress=support@xxx.nu
2022-11-20 15:26:32 Control Channel: TLSv1, cipher SSLv3 DHE-RSA-AES256-SHA, peer certificate: 2048 bit RSA, signature: RSA-SHA256
2022-11-20 15:26:32 [brdr] Peer Connection Initiated with [AF_INET]xxx.167.171.6:1194
2022-11-20 15:26:33 MANAGEMENT: >STATE:1668954393,GET_CONFIG,,,,,,
2022-11-20 15:26:33 SENT CONTROL [brdr]: ‘PUSH_REQUEST’ (status=1)
2022-11-20 15:26:33 AUTH: Received control message: AUTH_FAILED
2022-11-20 15:26:33 SIGUSR1[soft,auth-failure] received, process restarting
2022-11-20 15:26:33 MANAGEMENT: >STATE:1668954393,RECONNECTING,auth-failure,,,,,
2022-11-20 15:26:33 Restart pause, 5 second(s)
2022-11-20 15:29:37 MANAGEMENT: Client disconnected
2022-11-20 15:29:37 ERROR: could not read Auth username/password/ok/string from management interface
2022-11-20 15:29:37 Exiting due to fatal error
Hi,
first of all, thank you for this beautiful tutorial on this topic. I am researching on this topic since days now and this is the most complete one out there.
Unfortunately with the new OpenVPN Client ( i think from 2.6.0) they introduced OpenSSL3 which does not allow TLS 1.0 connections anymore.
Have you been in contact with this issue and if yes, any ideas on how to solve it (without downgrading the client version to an old one without OpenSSL3)?
What does it mean from a security point of view that they literately technically prevent people from using from TLS 1.0 based connections?
Thanks and BR, Dave
Hi. Thanks for the tutorial! I have som issuses trying to connect. If you wouldn’t min looking at my log file, and if you have the time maybe know a solution to my problem or maybe could give me a hint on where to go from here.
I’ve made it though al the steps but Im stuck att getting my Android device to connect.
This is my log from my OpenVPN app in my Android 13 phone
10:49 SIGINT[hard,init_instance] received, process exiting
10:49 WARNING: Compression for receiving enabled. Compression has been used in the past to break encryption. Sent packets are not compressed unless “allow-compression yes” is also set.
10:49 DEPRECATED OPTION: –cipher set to ‘AES-128-CBC’ but missing in –data-ciphers (AES-256-GCM:AES-128-GCM:CHACHA20-POLY1305). OpenVPN ignores –cipher for cipher negotiations.
10:49 OpenVPN 2.7-icsopenvpn [git:icsopenvpn/ v0.7.43-0-gd861 a1 23] arm64-v8a [SSL (OpenSSL)] [LZO] [LZ4] [EPOLL] [MH/PKTINFO] [AEAD] built on Dec 14 2022
10:49 library versions: OpenSSL 3.0.7 1 Nov 2022, LZO 2.10
10:49 WARNING: No server certificate verification method has been enabled. See http://openvpn.net/howto.html#mitm for more info.
10:49 TCP/UDP: Preserving recently used remote address: [AF_INE1xxx.xxx.xxx.xxx:1194 10:49 UDPv4 link local: (not bound)
10:49 UDPv4 link remote: [AF_INET]xxx.xxx.xxx.xxx:1194
10:49 WARNING: this configuration may cache passwords in memory — use the auth-nocache option to prevent this
10:49 TLS error: Unsupported protocol. This typically indicates hat client and server have no common TLS version enabled. This can be caused by mismatched tls-version-min and Is-version-max options on client and server. If your OpenVPN client is between v2.3.6 and v2.3.2 try adding tls-version-min 1.0 o the client configuration to use TLS 1.0+ instead of TLS 1.0 only
10:49 OpenSSL: error:0A000102:SSL routines::unsupported protocol 10:49 TLS_ERROR: BIO read tls_read_plaintext error
10:49 TLS Error: TLS object -> incoming plaintext read error 10:49 TLS Error: TLS handshake failed
10:49 SIGUSR1 [soft,tls-error] received, process restarting